I’m Nikolay Milya, a Senior Full-Stack Developer at Sphere Partners. In this article, I am going to explain how to build a pipeline to automate the ML training process. The machine learning process from my perspective depends on two parts. The first one is how we train the model and how we receive the predictions. The second part is how we use it in real life and how we can scale it. Let’s start with an example of a basic ML pipeline. It consists of 4 steps. Let’s go through each step.
1. Data Collection
The first step is data collection. We start by collecting the data and preparing it for training.
2. Model Training
The second step is model training. Once we have collected the data we need, we can begin our model training.
3. Model Evaluation
The third step is model evaluation. This is where we evaluate the accuracy and the efficiency of the model.
4. Providing Predictions
The last step is where we provide our predictions. This is where we take our model and provide predictions based on our needs.
Based on this flow, I have underlined three common issues we face during our development process. You can see these in the visual example below of this machine learning pipeline.
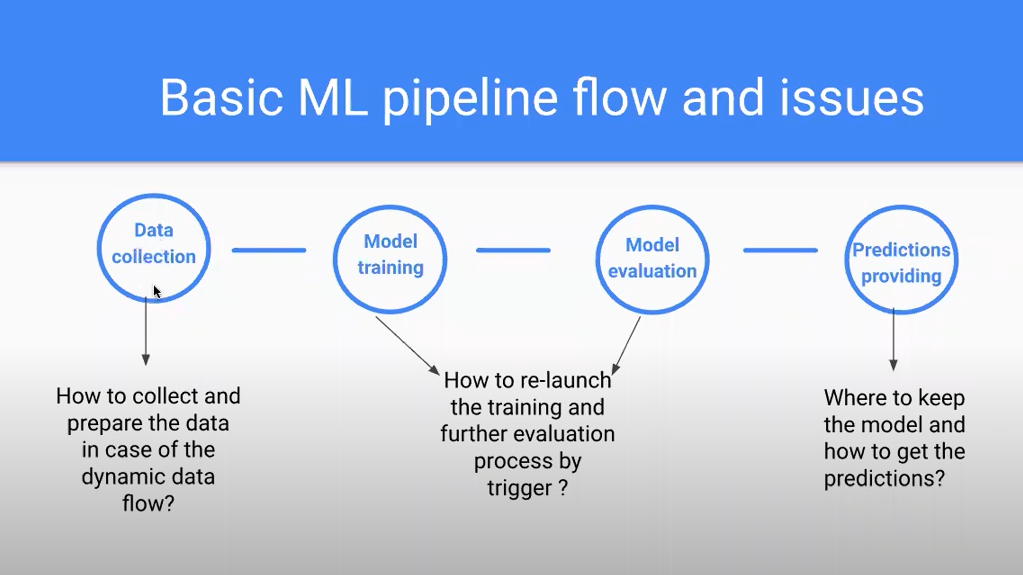
The first problem is:
How do we collect and prepare the data in case of the dynamic data flow?
Let’s imagine that we have an application which we need to scale and we have an increased amount of data every day stored somewhere. Based on this data, we need to retrain our model. For example, if we have an application that collects the user’s input, then of course we need to retrain our model perhaps even on a daily basis. And we need to do it automatically.
The second problem is:
How do we relaunch the training and evaluation process by trigger?
This is all about knowing when to relaunch our training and how we need to do it.
The third problem is:
Where do we keep the model and how do we get the predictions?
In general, there are two approaches on deciding where to keep the model. The first is in the cloud and the second is locally. I’m going to go through the advantages and advantages of both.

1. Storing model in the Cloud
Advantages
- Possibility to create the model as a microservice
- Not high level of labour-input
- Good choice for dynamic data flows which don’t require the multiple re-trainings of the model in a short period of time
Disadvantages
- API calls decrease speed – every time we need to make an API call, we need to wait for a response and we might have delays and timeouts – this isn’t sufficient for all types of projects. For example, if you have a streaming data flow, a camera, we can log a big amount of data and we can retrain the model to get new predictions every second, but then it’s not sufficient for this case because it will take a lot of time to load the data.
- Low quality model optimization may affect the timeouts
- Bad choice for “streaming” data flows
- Cloud services are not free of charge
2. Storing the model locally
Advantages
- Increased speed, doesn’t depend on the network – no API calls so we don’t have the disadvantage of delays as in the Cloud
- Doesn’t require extra payments for services
- Good choice for static or streaming data flows – as the model is located locally so it doesn’t require any third party services to be paid for or to wait for a response for a long time
Disadvantages
- Low scalability – located locally so not possible to produce it like an API call. For example, if other applications would like to receive this data, it needs to take care of how to load the model locally.
- There is no way to make a general API endpoint as a service
In general, the pipeline should resolve these three problems for us mentioned earlier and displayed in the image provided. It should reduce the amount of manual work, increase the scalability and enable us to customize the process.
For a practical example of this pipeline I’m going to walk you through, I’ve used these tools:
- Project boilerplate – boilerplate code which includes the logic of validating the data and training the model.
- GitHub Actions – GitHub service to trigger the events of the pipeline
- GCP services – Google Functions, Google Storage, Cloud Build
Now let’s go through the pipeline flow. As I take you through the next steps, please keep in mind I have a project already set up with a pre-built pipeline for it. There are four actions I’d like to point out here.
1. GitHub actions triggers installation of dev dependencies
2. GitHub actions loads the data set from GCP Storage
3. Model training and metrics update
4. Model is deployed to GCP as Cloud Function
To create a pipeline, you need your own Google Cloud project. To do it, you can select to create a new project in GCP. It takes a few seconds. You select a name and get a project ID and number. We will later use the project ID generated to automate our pipeline.
Now, we need to enable our Cloud Build API. This is an important step – if you don’t enable it, you won’t have access to the Cloud Build services. Next, we need to create our app engine. It provides the resources for our cloud services. For this, we need to go to the App Engine dashboard and select to “Create Application”. From there, it will ask you to select a region. From a drop down menu list, it will show where our engines are located. It doesn’t mean, however, that if one is located in one continent and one in another, that we can’t use it in both. For example, if we created one with the region North America, it doesn’t mean that we can’t use it in Asia. We can, but the people who are located closer to the engine’s region, theoretically they will have an increased speed ability.
Next, you need to create a service account. A service account enables our app engine to use services of GCP. If you don’t have one, you cannot use them. You should never delete a service account. It’s used in the cloud build so deleting it will cause an issue where the automated build will not be allowed.
After we create our service account, we need a key. We go to the “Keys” feature, and select “Add Key” and “Create new key”. Select “JSON” as your key type. After you download your key, make sure to keep it stored somewhere safe – you will not have the option to download it again.
Once all of this is done, you have nearly everything you need to connect to GitHub.
In my GitHub account, I have a boilerplate project which includes the logic. These are the requirements – you can also think of it as the packages necessary for our pipeline and we can use it to install these packages automatically. It also includes our final predictions and our pipeline.yml file. It consists of the jobs and the steps, such as “Set up Python”, “Install Python dependencies” and so on.
 - name: Set up Python ${{ matrix.python-version }}
      uses: actions/setup-python@v2
      with:
        python-version: 3.7

    - name: Install Python dependencies
      run: |
        python -m pip install --upgrade pip
        pip install -r requirements.txt
If we go to the Settings, then select Secrets, we have to add two values. My project here is named for example GCP_PROJECT_ID but you can choose a name. As for your project ID, you can find it in your GCP dashboard. The second one I have is “GCP_SA_KEY” which is the service account key which we downloaded as a JSON earlier.
Next, we build our pipeline.
Go to “Actions”, where we have our workflows. From there, I select “Run workflow”. It takes about a minute to complete. After it’s done, you can see a list generated in GitHub from the actions in the pipeline.yml file we mentioned earlier.
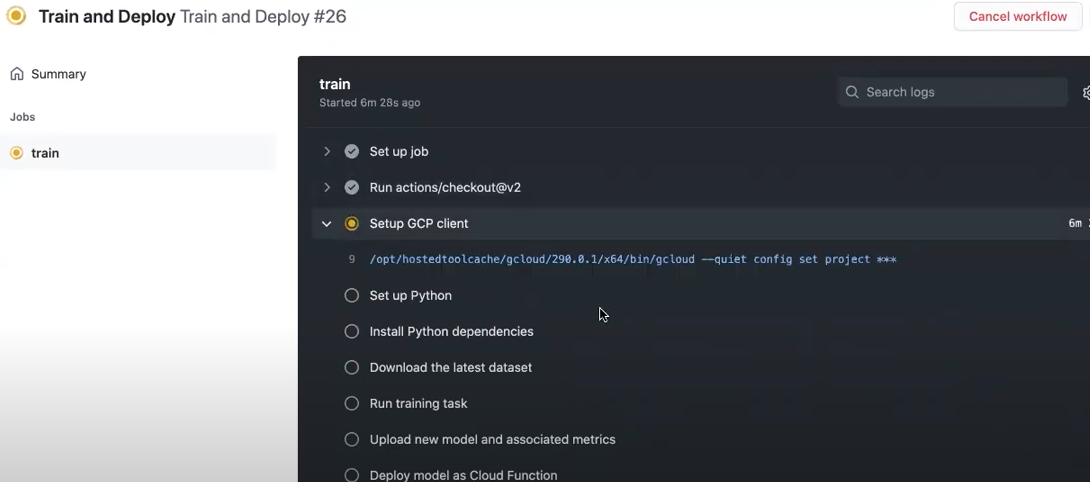
This list is active and it’s in the training process. At this stage, you would see the jobs in action. You can see each action completed with a checkmark next to each one as they go – and after they all complete, that’s it! Our model is trained.
How do we then find our deployed Cloud Function?
We go back to Cloud Functions in GCP and we can find the Cloud Function we just deployed. We can open it and see some statistics regarding our Cloud Function, including the execution time, memory utilization and active instances. There, I selected “Trigger” to find my Trigger URL. This is the URL we can use to receive our predictions. If we take the URL and go to “Postman”, we can insert the URL, click “Send” and we receive our data. Our pipeline works and it deploys the trained model for us to Google Cloud.
This is all it takes to build an automated pipeline for the deployment of an ML model. When we receive new data, this is uploaded to the GCP storage and then we can retrain our model. In my example project for instance, it triggers in three cases. The first case is manually, the second is when I push some code to my master branch in GitHub and the third case is a schedule by cron. If you’d like to see this in action, check out the video below.
Need help with deploying a machine learning model? With years of experience of training and deploying ML models, we can help you with your own. Start by telling us a little bit about your project idea here.