
My name is Ivan Garmatenko and I’m a Full Stack Developer at Sphere Partners. Here, I’m going to talk about docker images building, optimization and security. More specifically, I’m going to address docker architecture, images & layers, ways to optimize, alternative builders & briefly mention images security issues.
Docker layers
A docker image consists of multiple layers, and layers contain filesystem changes. Below you can see a screenshot of the GitHub dive tool which you can download and run against any existing image you have locally.
On the left side, you can see all the layers the image has, and on the right, the filesystem changes related to each selected layer. I find it very useful and recommend it for optimizing images and if you are interested in what files are contained in each layer. This tool can also be easily integrated with CI, because it calculates an efficiency score which could be asserted on CI. Next, we need to know that each layer depends on the previous one. From a cache perspective, this means if any layer is going to be rebuilt, all the layers after it will be obsolete.
What could be optimized?
For the article I’ve prepared this dockerfile. It’s built for the regular Rails application with some specifics. For example, we additionally install PostgreSQL binaries through the postgresql-client library. Also we specify a bunch of environment variables used by application and bundler for private gems installation.
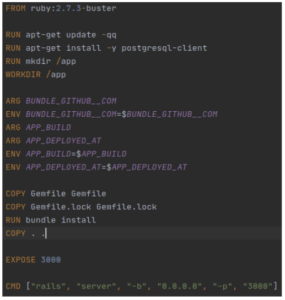
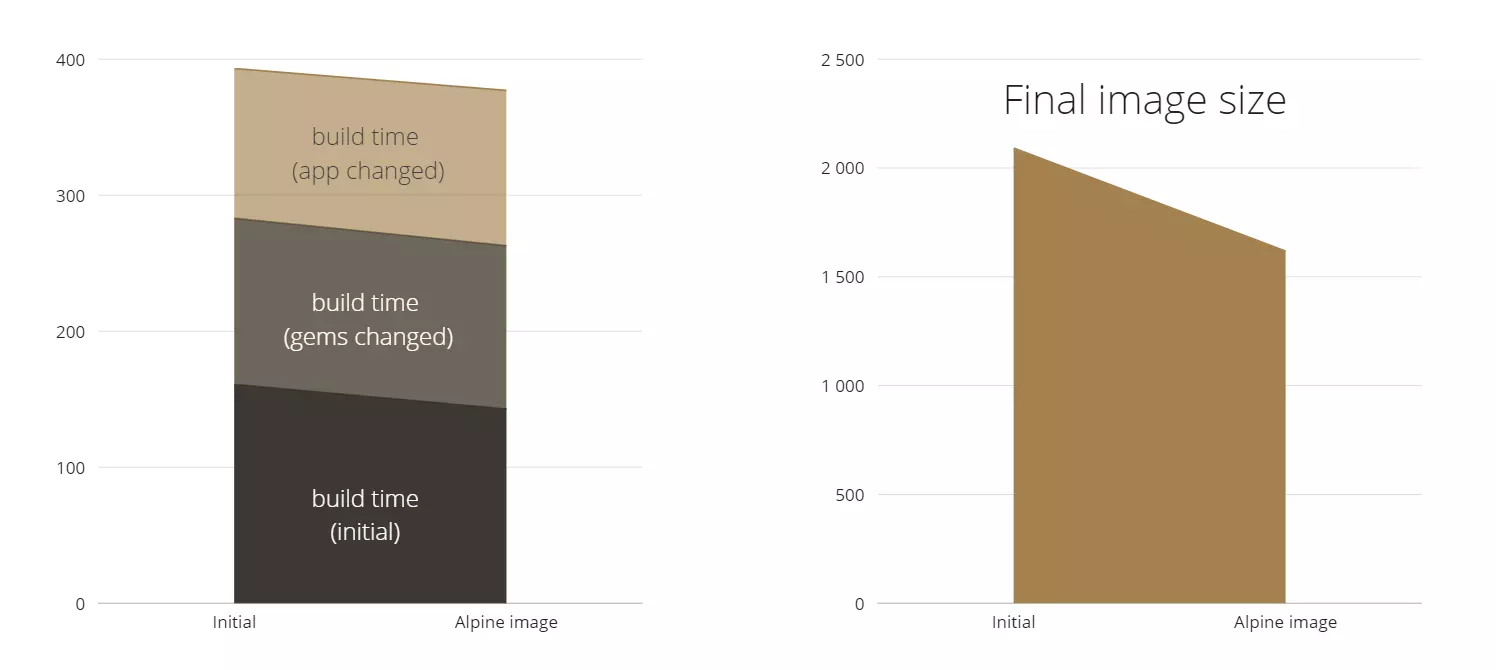
To build this image I’ve copied files from an existing working project and when I measured the final image, I noticed that it became 2090MB in size. I also measured the build time. The first build took 161 seconds, when I ran it the first time with no cache locally. The second one took 110 seconds, after I changed some Gemfiles, and for the third time I changed some application code and then ran it, and it took 122 seconds.
So what could we actually optimize?
The way I see it, only three things: file image size, build time & security.
Change base image
The first optimization is to choose the correct base image. There are three options:
- Start from scratch and build the operating system and install it. But this is not efficient at all.
- Pick the best operating system image you want and install all the required libraries into it.
- Choose a specific image with libraries you need already integrated.
Here I’ve used the third option. The first thing I did was change the “buster” to the “alpine”.
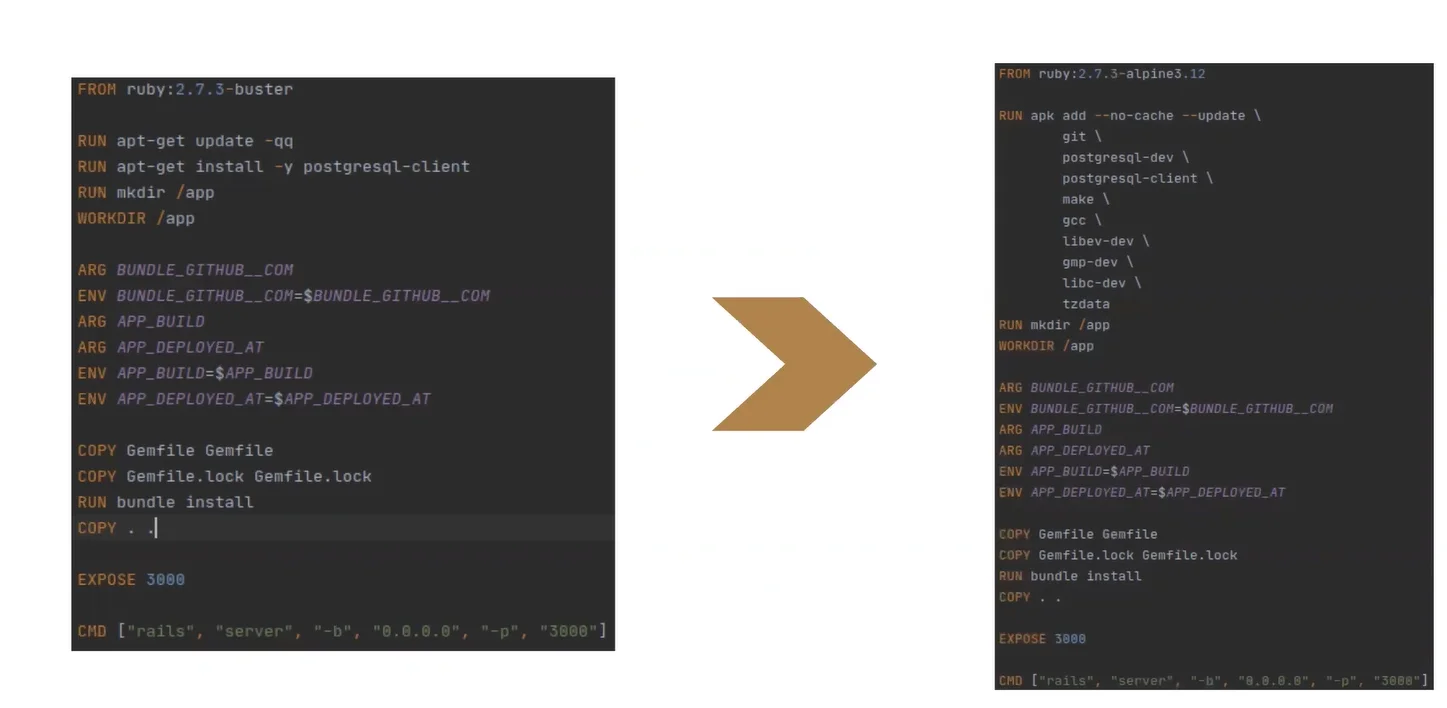
Secondly, I changed the syntax of the package manager because we changed the operating system. I then measured what changed and noticed we significantly reduced the image size and the build time.
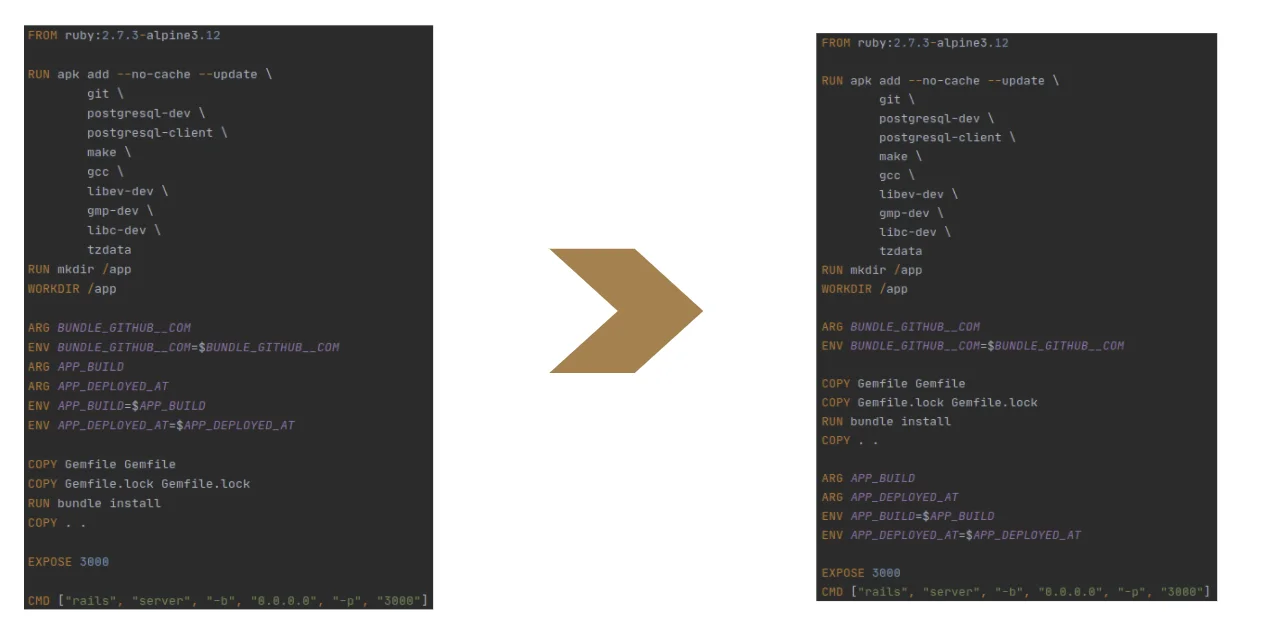
The second optimization I would apply is reorder instructions. The most recent instructions should be placed at the bottom and the instructions which can be changed less frequently, on the top. The reason I’ve put the instructions related to environment variables at the bottom is because they’ll be changed every time, from build to build. Next I put the instructions related to the application code and after that, instructions related to the Gemfile, because we change the application often, but gems not as often. Finally, instructions related to the system libraries will be at the top of the file.
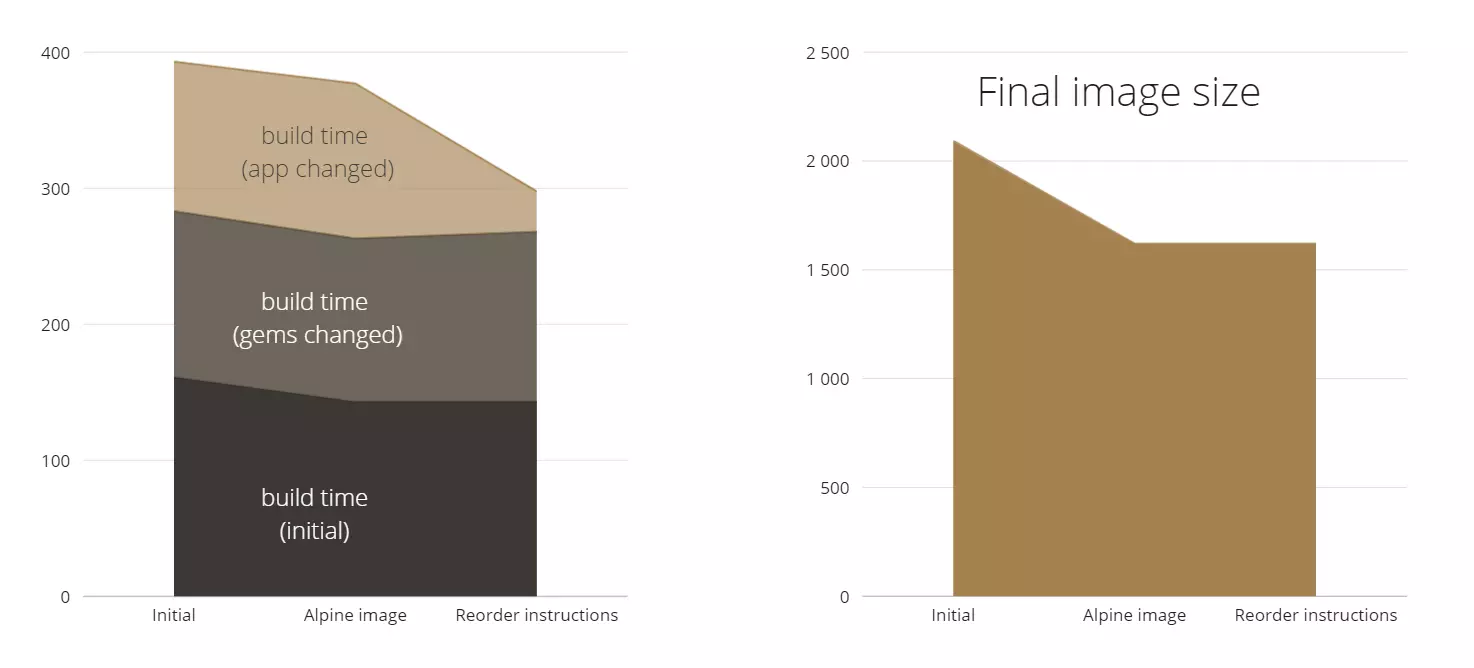
So, we didn’t affect image size this time around. But we reduced the build time a lot.
Specify .dockerignore
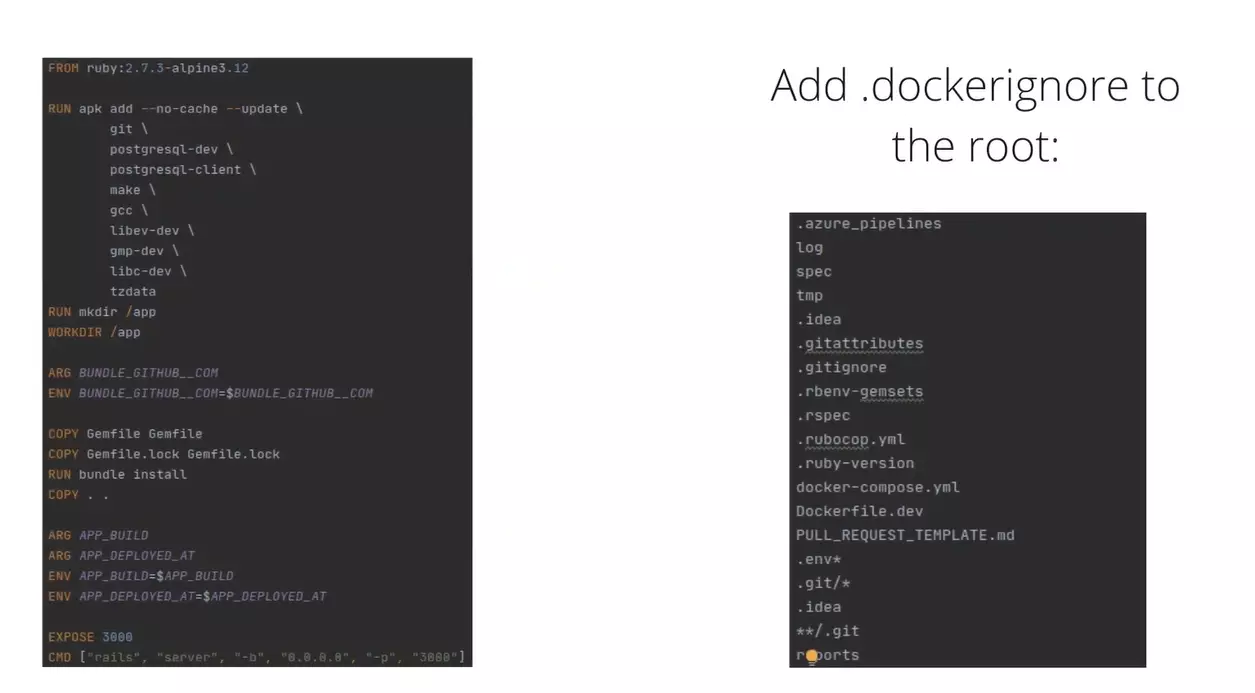
Next important thing I want to add is .dockerignore. It’s needed to describe all the files which shouldn’t be a part of the image. I’ve specified several files, folders and patterns (see screenshot). This time nothing was changed on the dockerfile itself. Now let’s measure.
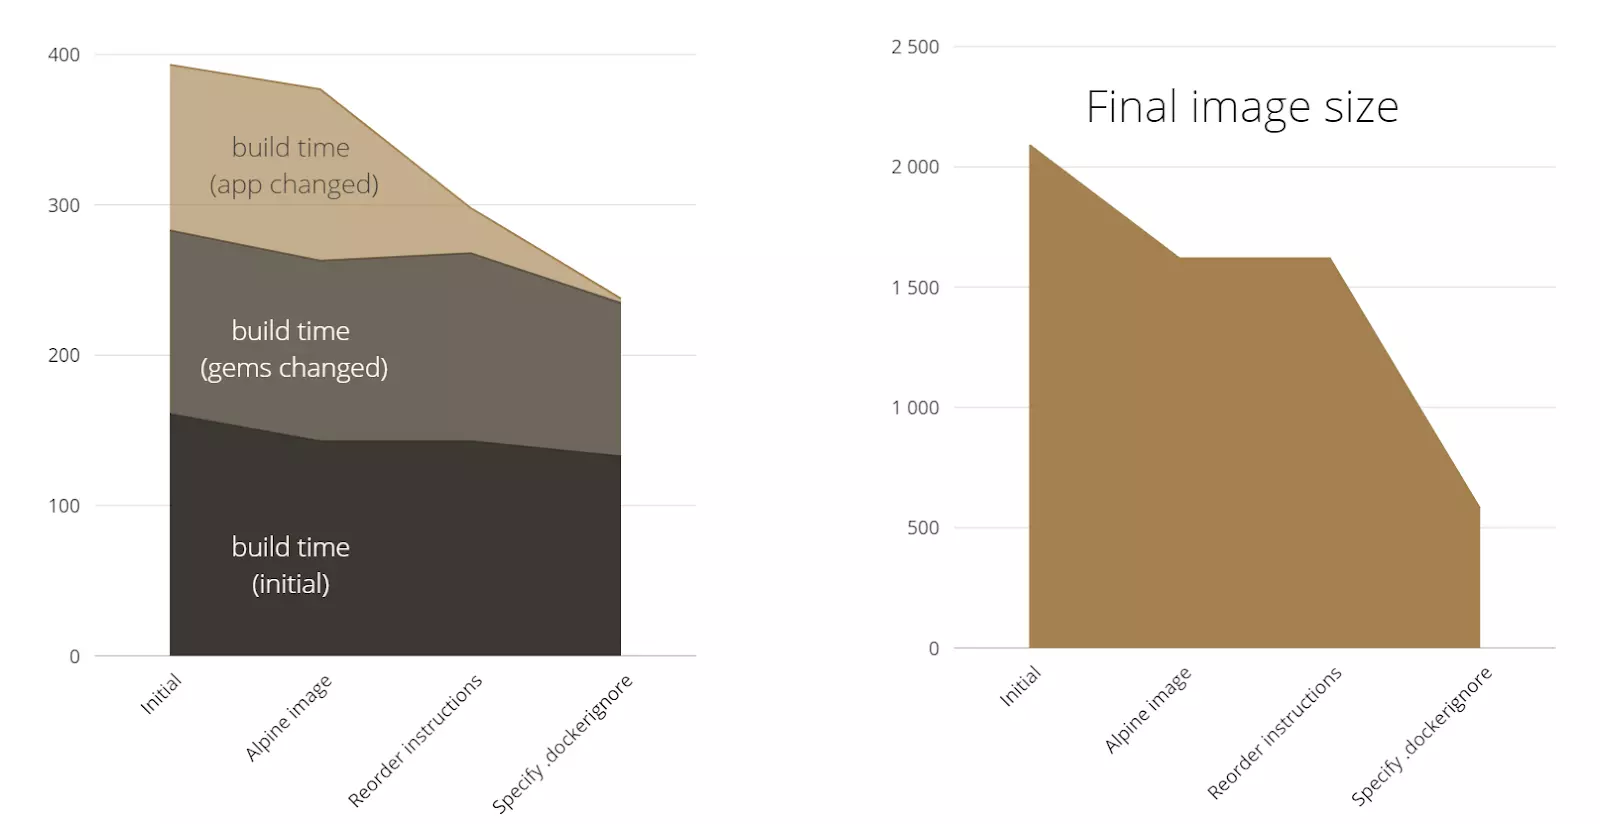
As we can see, we significantly changed the image size, by almost 1GB. I suppose the Git files and some temporary files were previously included in my image and because of that we decreased the amount of application files a lot. As a nice bonus we also decreased the build time.
Use multistage
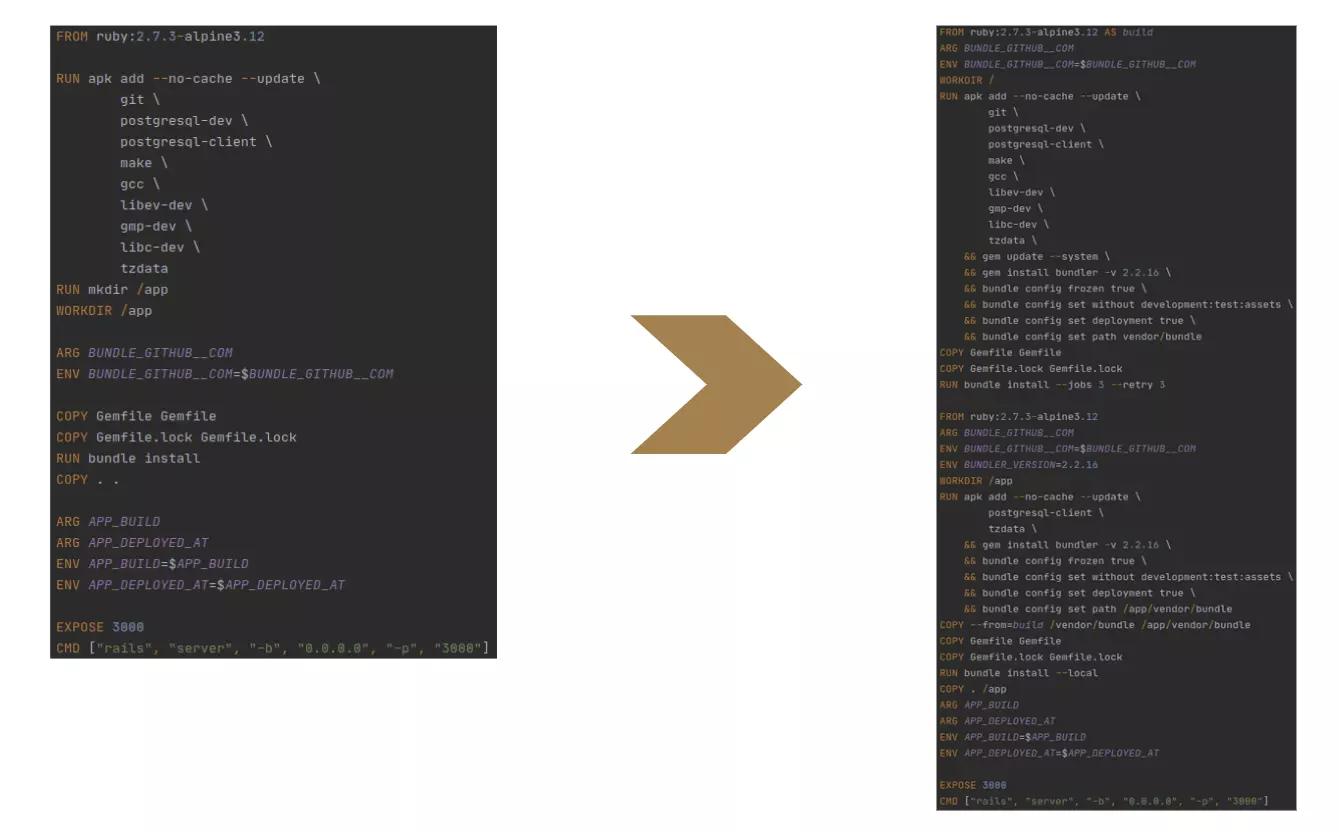
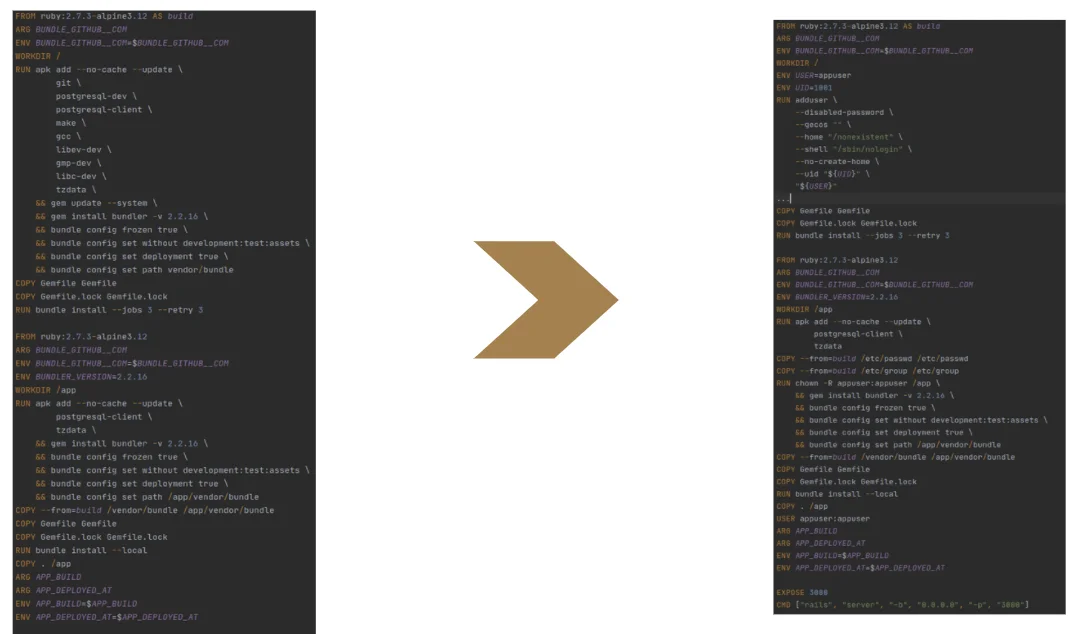
The next possible optimization is multistage. Why do we need it? In the original dockerfile, you see some installed libraries like gcc or make, which we needed only to build some gems and build native extensions. And we don’t need those libraries on a runtime. We can resolve this in 2 ways.
Firstly, we can add instructions to remove those libraries at the end. But from my experience, this might be problematic because these libraries automatically install some dependencies. This is why it’s efficient to use multistage. Instead of having just one single image, we’ll have some intermediate image. This splits the original dockerfile into two parts, two different images. The first is intermediate, designed only to build all the gems. Here I’ve installed libraries, built gems and injected all the gems through copy instructions to the final image.
Now let’s measure what we have.
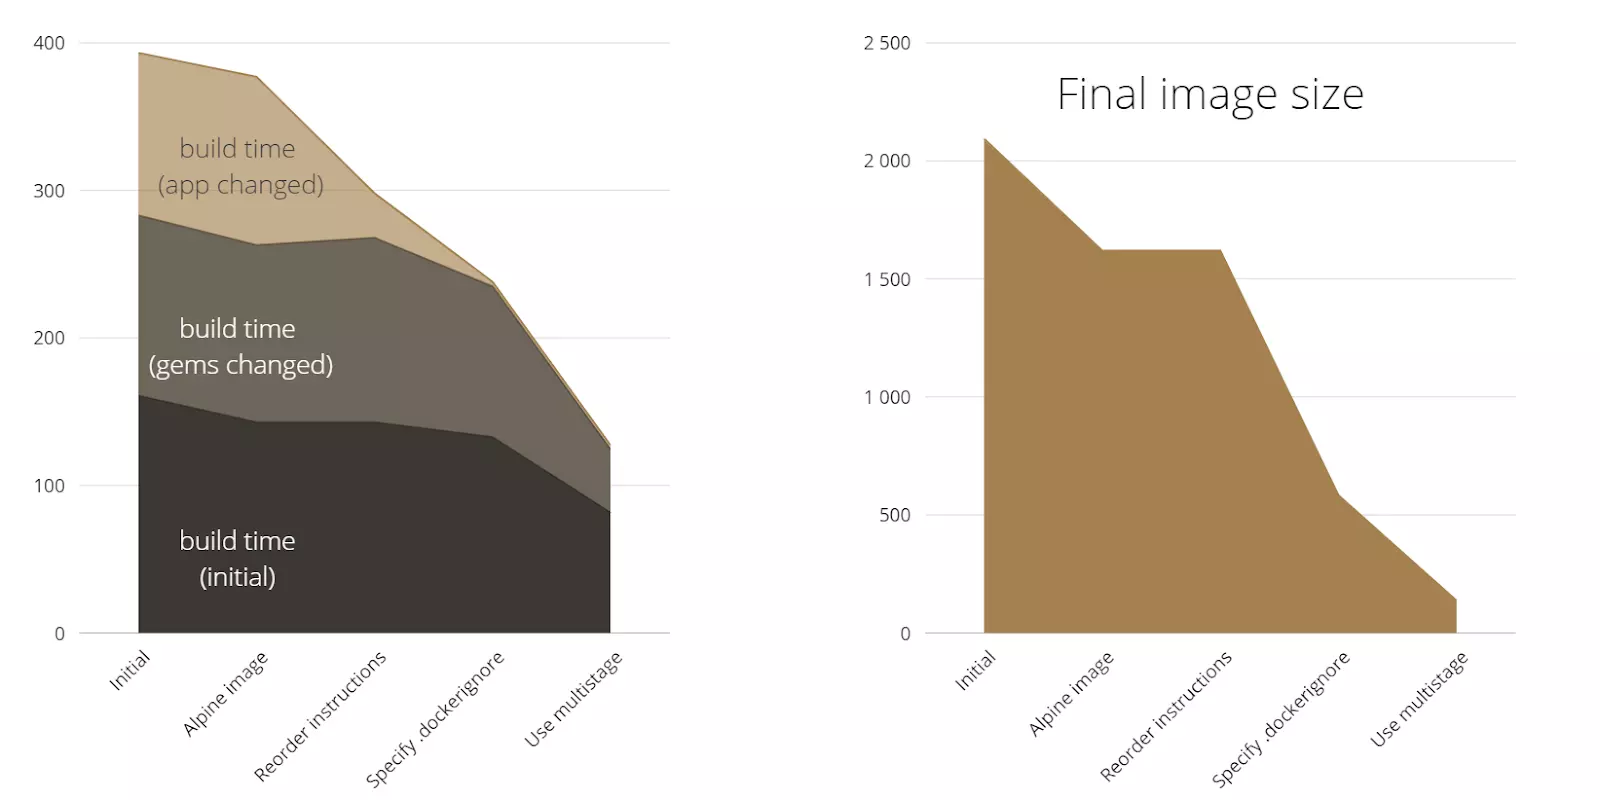
You see the final image size is very small now, about 150MB and build time has also significantly decreased.
For an alternative builder, I would suggest BuildKit. To enable BuildKit, set the DOCKER_BUILDKIT=1 environment variable when invoking the docker build command, such as:
$ DOCKER_BUILDKIT=1 docker build
To enable docker BuildKit by default, set daemon configuration in /etc/docker/daemon.json feature to true and restart the daemon:
{ “features”: { “buildkit”: true } }
Now let’s measure the changes after the use of BuildKit.

As you can see the final image size didn’t change but the build time decreased by about 10-15%.
Let’s summarize what we have accomplished here.
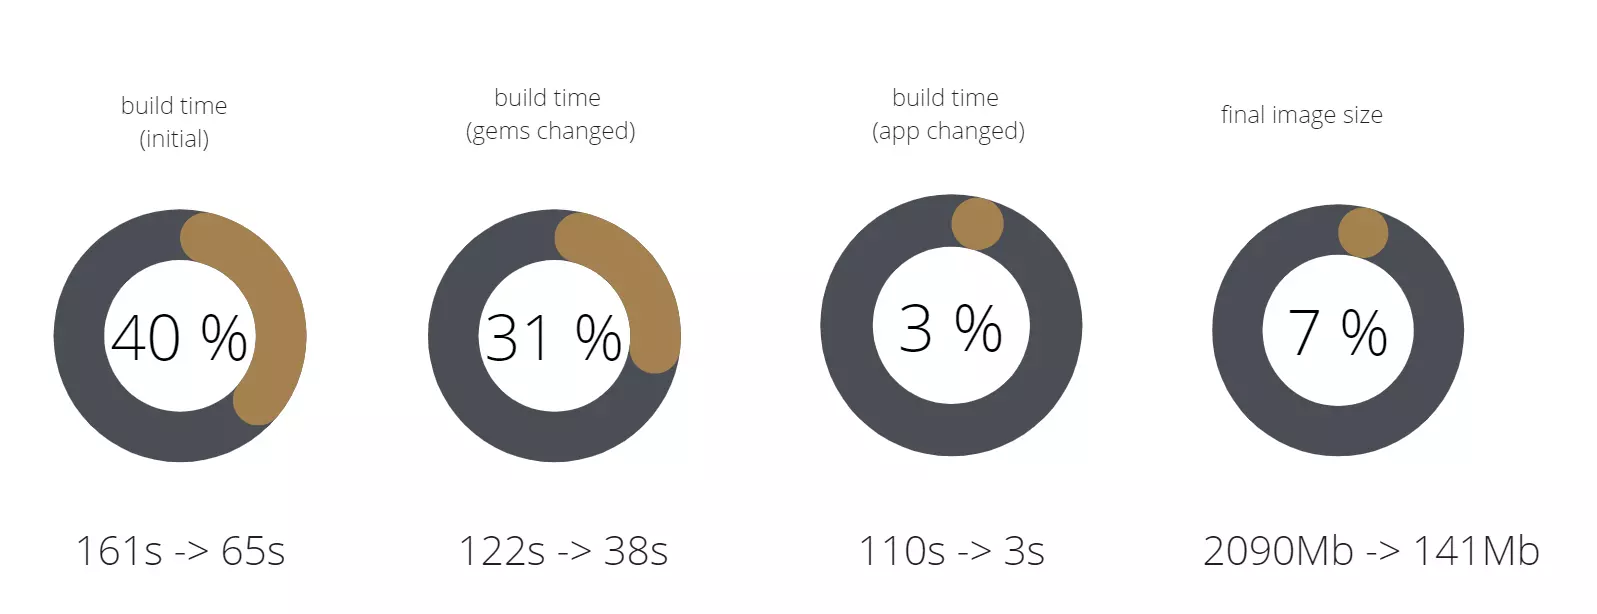
Firstly, we greatly decreased image size, from 2090MB to 141MB. Now it’s only 7% of the initial image size. Our build time has also decreased overall, you can see the exact outcome in percentages in the image above.
Alternative builders
BuildKit

BuildKit is a toolkit for converting source code to build artifacts in an efficient, expressive and repeatable manner. It provides a standalone tool which has a lot of functionality for working with cache and layers. However, I personally wouldn’t use it in production as standalone as it’s already integrated in the docker. But I recommend checking the BuildKit functionality for yourself and see if it’s useful for your project.
Buildah

The main difference between docker and buildah is that buildah is a standalone binary. Buildah facilitates building OCI images.
Img
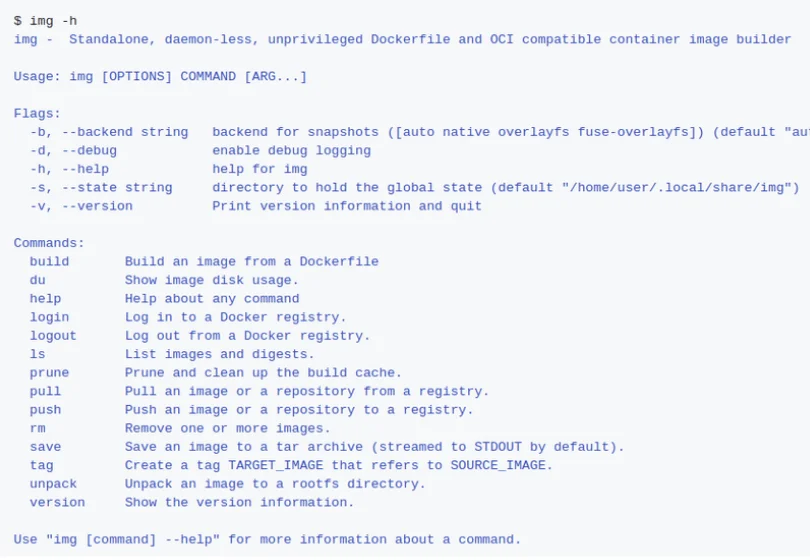
This builder is quite impressive. Img is a standalone, daemon-less, unprivileged Dockerfile and OCI compatible container image builder. It’s also the fastest one. It’s easy to migrate from docker to img because it has the exact same interface.
Kaniko
To run with Kaniko, you need an executor and shared build context. Kaniko can read your build context from several places such as Google Cloud, GitHub & GitLab. You also need a hosted executor. You can still use docker to run executor and even more impressively, set up a pod in Kubernetes cluster and your image will be built by Kaniko’s pods, which is great because it can be customized. However, compared to the others, it showed the slowest speed.
Let’s compare all. As you can see in the image below, img stands out as the winner. From my experience, docker 19-20 works almost as good as img, maybe even faster.
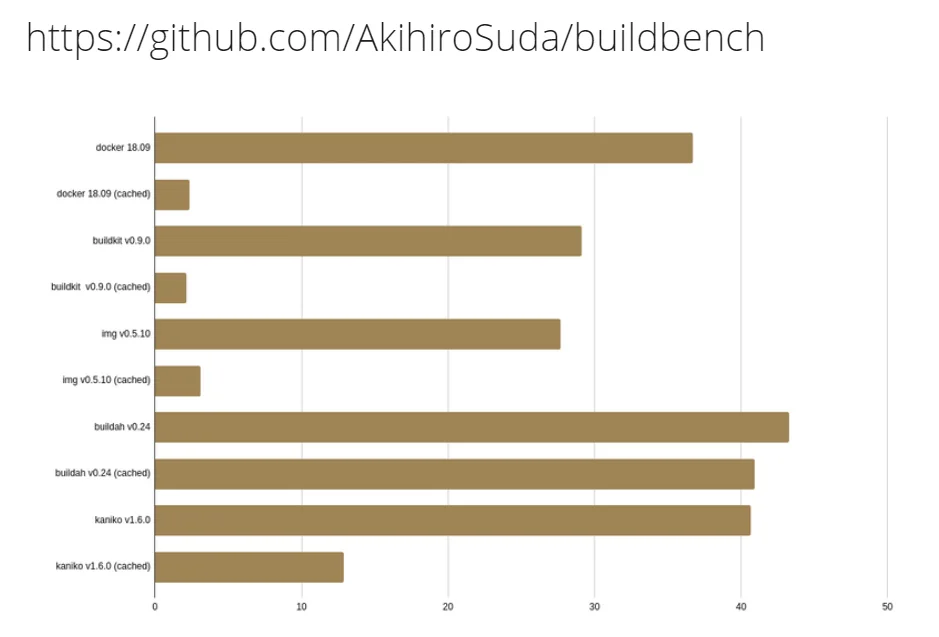
Here you can find a repository which provides the bench and scripts.
Security
As I mentioned at the start, I am also going to talk a bit about security. From the dockerfile point of view, you need to add the user and copy settings with copy instructions and then change the owner of all application code.
This dockerfile is ready to be used in unprivileged mode. When you run sh against this image container, you’ll be logged in as a user and cannot run any command required root access. However you need to run the docker daemon from a user also. But only docker daemon starting from version 19.03 has this feature (but as experimental feature). And from version 20.x it’s officially supported.
That’s all we have here on building and optimizing docker images. I hope this was helpful to anyone wanting to optimize their Docker images.
Need help with a development project? Don’t hesitate to contact our team of expert developers.