
My name is Artem Kovshov and I am a Front End Software Developer at Sphere Partners. In this article, I’m going to talk about NPM packages. Stick around to see how to create an NPM package from scratch and how we can do it better.
The motivation for me to tackle this subject is that front end developers often do not know how NPM packages are created. For years as a front end developer, I only knew how to use them, but I didn’t know how they work, how to create or publish them. I now have an understanding of how to create these packages from scratch and would like to share this knowledge with you.
Let’s start with some terminology.
I named this presentation as an NPM package talk, but I would say there is no such thing as an NPM package. NPM is just the default package manager in Node.js but there are other package managers. I decided to proceed with the NPM package manager. Other examples include Yarn, pnpm & Rush.
How NPM packages work
Usually, when you develop an application, you need a shared code to inject. You find its name, version, you select to install it, inject it and bundle it. But someone also has to publish this package to Node.js registry. It’s done using npm publish command which I’ll talk about later. The goal is to have your package appear in a registry, perhaps a global registry or a local registry to be used for your project.

Why do I need my own package?
There are a few reasons why you might want to create your own package. These include:
- Separate some common code from the rest of the project
- Easily share your code with the team
- Maintain different versions of your code
- Share your thoughts with the rest of the world!
What is an NPM package?
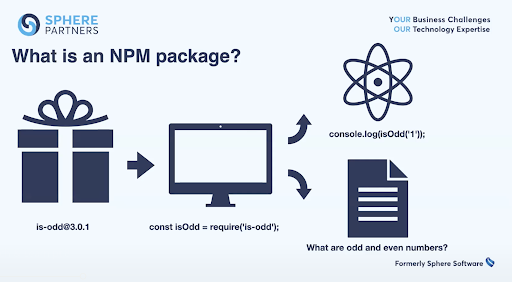
When we talk about an NPM package, we usually mean a package somewhere on the internet, with a name and a version. You can take it and install it to your local computer and use it for your project, after which you can use it in your application.
In this case, NPM packages consist of two parts: the code & documentation to refer to while working with it. This is how it looks like for regular development:
But if you check in the documentation, it’s a bit more different & complicated, and nested like a Russian doll. It consists of layers, with the first layer being the code. So, you created something, you wrote the code, some methods, some components. Next, you need to create a package.json file. It provides the interface for NPM or other package managers to communicate with the code and this allows you to publish it somewhere.
After that you need to wrap it up with some archive, such as gzipped tarball. Then you need a resolve URL, a reference to this tarball stored somewhere on the internet. Through this URL, you and other people can access it.
The next layer is name and version which refers to a specific URL, stored somewhere and users can access using this URL. But this isn’t the only way they can access it. There is a sublayer called tags which allows you to access name and version using more readable language. Lastly, we have the GIT URL which is the URL you’d use to store your project on GitHub.
Creating a package: step-by-step
Let’s go straight to the workflow. How do we create this package? It’s a really simple process.
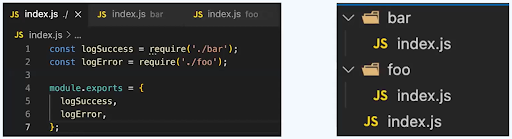
First, you need to create some code. Here I wrote some methods, I have two modules and an entry point called index.js. I import these models and the entry point and export it somewhere else.
What I need next is package.json to actually provide an interface to communicate with this NPM.
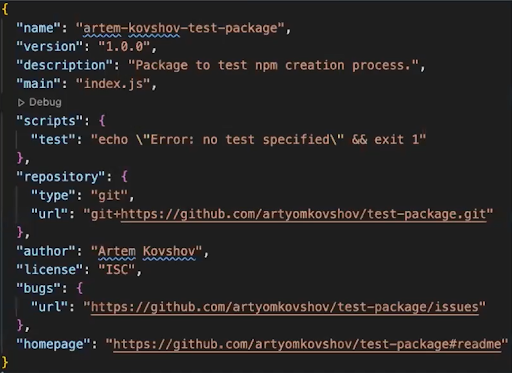
You can run the npm init command to create some generic version of package.json. It’s going to ask you some questions here to create a boilerplate file with required fields. We are going to address these fields later, but for now, we are going to focus on name, version, repository and entry point to the application.
Next, you want to create an .npmignore file. This looks similar to .gitignore and what it does is it omits files you specified and doesn’t add them to your package. Finally, you need to create the user. If you don’t have a user in NPM already, you need to create one. Don’t forget to verify your email! You’d have to check your email for this.
After this, run npm publish command to publish your package. And you’re done! You now have a package available in NPM. You can open it in a web browser and others can download it.
Let’s dive into the entities I’ve mentioned here. The first one is package.json.
Creating a package: package.json
Let’s go through some of the fields.
Name
- Identifies package;
- Should be URL-safe;
- Should be short (up to 214 symbols)
Version
- Identifies package along with name
- Follows node-semver
Bugs
- URL by issue tracker
- Used by npm bugs
Files
- Contains patterns for files that must be included
- .npmignore but vice versa
Main
- Defines entry point for your package
- Root folder by default
Engines
- Defines node and npm version for your package
Creating a package: npm API
npm adduser
- Creates a new user
- Requires email, login and password
npm pack
- Packs folder to a tarball;
npm publish [<tarball>|<folder>] [--tag <tag>]
- <folder> – with package.json file (‘.’ If not specified)
- <tag> – registers package with a given tag (‘latest’ if not specified)
- <tag> – registers package with a given tag (‘latest’ if not specified)
- <tarball> – path to tar archive with your projects
npm unpublish [<@scope>/]<pkg>@<version>
- Removes all versions of a package if version is not defined
- Removed combination of name@version was published less than 72 hours ago
npm deprecate <pkg>[@<version range>]<message>
- Marks your package as deprecated (will provide specific warning during installation)
Creating a package: dist-tags
- Distribution tags (dist-tags) are human-readable labels that you can use to organize and label different versions of packages you publish
- Shares the same namespace with semantic version
- Examples: «latest», «stable», «release», «beta» – whatever is convenient for you and your team
- Packages may be installed using tags: npm install —tag <tag>
Publish with a tag:
npm publish —tag beta
Adding to existing version:
npm dist-tag add <package-name>@version> [<tag>]
Clears a tag from a package:
npm dist-tag rm <pkg> <tag>
Shows list of tags:
npm dist-tag ls [<pkg>]
For more context on all of the above, watch the video at the top of this article where I explain in a bit more detail.
How to improve your package
Adding complexity
What we just covered is a simple flow, consisting of only two steps: development and publishing. But to create something more substantial, we need to add more steps. To add complexity to the flow, we would include more steps, such as automated testing, bundling, documentation and publishing. I’m going to go through all these phases and give you some tips on the entire process.
Development
During development, you will use some lint checkers, such as linter (eslint), code style checking, commit to a name convention and write some documentation.
Testing
For testing, make any tests you want (client, unit, integration, e2e), it all depends on your package and project. Don’t forget to also create a test coverage report and attach it to your package to show people that it’s maintainable and works well.
Bundling
Ask yourself first: do I need my package to be bundled? It’s not always required. If you do require it, feel free to use tools such as Webpack, RollupJS & Parcel.
Documentation requires you to compile different types of modules. For browser, compile to a script. For NodeJS, compile to UMD. For both browser and NodeJS, compile to CommonJS.
Documentation
It’s always nice to have a lot of documentation. You can approach it in different ways, it’s not always necessary to write a huge document with it. You can make specifications in the project itself, prepare test files or use your test to show real live examples. Or you can add live examples of your code in third-party sandboxes (e.g. codesandbox, jsfiddle). Don’t hesitate to write JSDocs for your API.
I’d also recommend you use automated tools to generate documentation from JSDoc (jsdoc, jsdoc-to-markdown, jsdoc-to-oas). These would save you a lot of time. If you develop a component library, consider using storybook.
Tools
Now we know how to publish a package. But this seems a little bit hectic. So every time you make a change to your code, you need to run npm publish again, specify version in your package.json file. So you probably want to skip all of this.
There is at least one fully automated tool that allows us to automate this process. There are more tools like this built with common patterns. I am going to review one of these tools, it’s called semantic-release. It’s a tool I’ve used for a project I’ve worked on and it does the following:
- Automates release workflow: determining the next version number, generating the release notes and publishing the package
- Enforces semver policy
- Formalizes commit messages
- Notifies maintainers and consumers about the fresh release

To elaborate on semver, for each package you have three numbers that define its version. There is the patch version, concerned with bug fixes or docs for example. If you add this, it’s going to increase your patch version. Next number is the minor and it means that you added new features, but it’s not going to break something. People can safely upgrade it and use it. The last one is major and it also means you added new features but this one results in breaking, so the user will not be able to use it in the way they could before.
Angular commit message convention
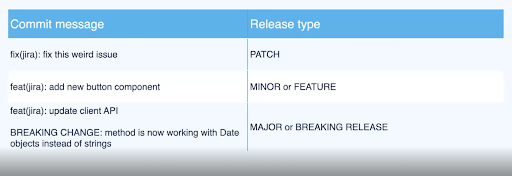
I recommend using a commit message convention. It’s really convenient and can be used in a lot of tools like Jira & GitHub. This requires you to create a commit message in a specific format. This format should have a prefix such as fix or feat (as seen in image above). Depending on the commit message, semantic-release will understand what you are doing: if it’s going to be a patch, a minor or a major release. If it’s a major release, don’t forget to add “BREAKING CHANGE”, or just “BREAKING” (depends on the tool you’re using) in upper case to show that this is a breaking change and you need to increase the major version.
How to work with semantic-release
Working with semantic-release includes the following steps:
- Set some branch as your release branch (e.g. master)
- Configure semantic-release step on every CI build of PRs against release branch (e.g. npx semantic-release after successful test run)
- Develop your changes, commit it using Convention, create a new PR against release
- semantic-release runs on CI, verifies changes, creates change log, sets semver and publishes a new release into registry
Lerna
Another tool I’d like to mention briefly is called Lerna. It’s another popular tool in package development and it’s really handy if you have monorepo. Below is an example of what it might look like.
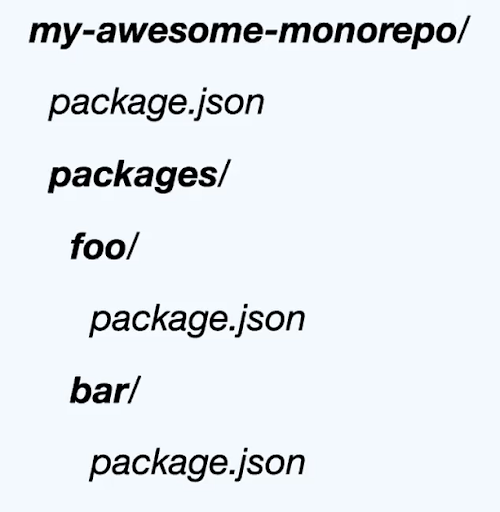
As you can see, it has monorepo and a few packages inside. In case you don’t want to run this for each package, this is quite popular in some git frameworks and applications like Babel, React & Angular. You need a tool that makes it work fast.
Lerna does the following:
- Allows you to control publishing process in monorepos with multiple packages
- Some well-known frameworks and libraries use such approach (e.g. React, Angular, Babel)
- Has two types of releases: fixed and independent
- Provides a set of useful commands
Two types of Lerna modes
Fixed
Fixed mode defines the single version for all monorepo. If you update packages, these will be bumped to the same version at the same time. As soon as a package is bumped to the major version, Lerna will bump all versions to this major version, so be careful with it. For example, in Babel, you can see that all of them have the exact same major version but probably some differences in patch and minor.
Independent
As for independent mode, it’s more flexible. Independent mode allows you to use different versions for contained packages. It doesn’t require you to have the same version for everything. Maintainers can update the version separately and it can be used with semantic-release.
Here are some commands Lerna offers:
- init: generates lerna boilerplate
- run: allows to execute some command for all packages (e.g. tests or compile)
- bootstrap: create symlinks for local dependencies and installs third-party packages
- create: creates a new package
- publish: publishes changed packages since last release
This pretty much sums up how to create an NPM package from scratch. I hope you found this useful and can apply it to your project.
Need some help from our expert developers? Don’t hesitate to contact us here and tell us about your project.